
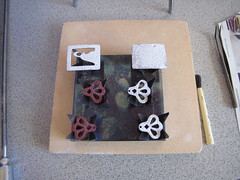
After sifting the 1st layer on and firing it in the kiln, this is what the pieces look like. The white ones all have a coat of white enamel, and the red ones have a coat of enamel flux on it.
There are several things I want to point out. First, the 2 pieces with the flux on them. Notice that they are red? The flux isn't red. It's clear. The reason the pieces are red is because of the oxidation process in copper. The back is worse looking. Black.
You don't have to completely clean the back before you apply your counter enamel if you don't want to, but you really need to give it a good brushing to get the chunks off.
Counter enameling is very important. And I learned that the hard way. Maybe I'll do a post on what not to do when enameling....;)
Counter enameling simply means applying enamel to the backs of the pieces as well. There is some kind of reaction between the glass and the metal that has something to do with the way pressure is exerted on it or something. Real scientific, I know. All I do know is, that applying enamel to both sides keeps the enamel from coming off. Very important.
Another thing I want to point out is, and it's especially noticeable in the white pieces...see how it's kinda spotty looking? It needs more layers of enamel. This is where the process gets time consuming but also exciting because each sifting gets you closer to the finished project. For example, on the lacy pieces, I enameled about 8 layers before I was happy with the results.
I used the lacy eyelet pieces to make a pair of earrings. From start to finish including all the sawing and refining of the shapes to the enameling and finishing with ear wires, they probably took me about 2 hours to make.
This is where my "how to" will end. As a beginner myself, this is just about all I can tell you. I will tell you one more thing...In between each firing, take a glass sanding block and smooth the surface of the piece. I've noticed that it really helps in the overall smoothness of the final piece.
I have read that enameling takes a minute to learn and a lifetime to master. I learn something new every time I sit down to enamel. I hope you have as much fun as I do enameling!
Thank you for all of these posts! You answered a question I had from looking at your shop before I had to ask - counter enameling. I have a much better idea of times and what tools & supplies I'll need to get too. All very helpful!
ReplyDelete