Friday, February 25, 2011

RAW52-8


With this ring I am officially on track with my Ring a Week project.

Let me tell you about this ring.  

Named:  Storm Clouds over the Mojave

A beautiful piece of crazy lace agate with reds, orange, variations of gray from charcoal to almost white. Cut by Jim Carrico, husband of my friend and colleague, Sandi of Sassy Glass Jewelry .
I cannot say enough about how wonderful it was to work with this stone.  
It is beautifully cut.  Stones cut this well are truly a pleasure to work with.

This stunning stone didn't need anything fancy.  Set simply in fine and sterling silver, she measures a US size 8.25, but because of the wide band it fits more like a 7.75.

To be listed in the shop soon.


Weekend Special!!

HeeHee!!  I was playing around a little with picasa this morning.

I won't even tell you how long it took me to make this one little picture, get it saved to my computer and uploaded to Blogger.  

Let's just say computer work isn't my strong suit.

Anyway.... :)  

Use coupon code "Earrings20off" to get 20% off your earring order.
Technically, the code will work on anything whether it be earrings or not, but I will only accept the code for earrings.  

Last week I had someone sneak in on me with an expired coupon code.  What can I say?  It was my fault for not deactivating it.  Live and learn eh?  So Please, just use the code on earrings only.  If it is used on something else, I will have to kindly return your money.  

Here is a link that will take you directly to the earring section of my shop.  

Sale is good now through Sunday night! 

Happy Weekend everyone!  TGIF

Thursday, February 24, 2011

Isabella's owl

Not the best pic in the world, I had to use the flash since we are under cloud cover today...

This is Isabella's first time using air dry clay. And of course she made an owl. She loves anything to do with owl, sometimes even referring to herself as an owl. It's the cutest thing. (My youngest feels the same about Pandas)

She has been taking art lessons for 4 years now, which has mainly entailed drawing and painting. (watercolors and acrylics) She told her art teacher she wanted to work with clay and she suggested Isabella start with the air dry clay. I think she was quite successful!

Now that I have the kiln, her teacher and I have talked about her working with low fire clay. Which I would also like to play around with to make my own beads.

Anyway, just wanted to share....

On my bench


Why do I always end up making earrings? :). Prepping silver components this morning so I can add beads during family movie time this weekend.

What are you guys working on today?

Monday, February 21, 2011

RAW52-7


Well, here is the ring for RAW week 7.

I haven't attempted anything new metalsmithing wise in awhile.  I must say that it is always a learning experience trying something new, and sometimes it is successful, and sometimes not.

I always like to start with the good.

1) This is a GORGEOUS marquis cut Labradorite, with a stunning blue flash that fades to turquoise on the bottom end.

2)  I have been wanting to make silver flowers for awhile now, and I love how these turned out.  They are a keeper for sure.

Now for the not so good.

1)  This is a really thick cab.  Too thick for me to use the fine silver bezel wire I have on hand.  So, I made the bezel out of 26g sterling sheet because that is what I had on hand. 

Well, live and learn, and I won't bore you with specifics, but I don't like it.  The stone is a little loose.  It has a bit of a rattle.  I just don't like it.  I should have used fine silver sheet, and made the bezel walls a smidge higher.  So now I know that.

2)  I hadn't ever used any embellishment sort of half on the bezel and half on the shank.  I was a little worried about the soldering there, but really it came out ok.  So now I know that.

3) I'm not sure about the overall design.  Something isn't quite right.  So, as a consequence, I'm going to wear it around for awhile before I deconstruct it and start over.

RAW Blog Carnival

I am super excited to be participating in RAW's first blog carnival!  This month's topic is:  
What was your inspiration for participating in RAW? 

My first inspiration would have to be following Tomi through last year's Ring a Day project on her blog.  I really admire her and the others who made it all the way through.  With ring a week, I am already a week behind.  How in the world did these people manage a ring a day?  It is beyond me.  

When Tomi announced in December that she'd be starting a RAW group.  I started toying with the idea of joining.  I figured I could handle a ring a week!  I started off with all kinds of big plans...I wanted every week to make a ring using a technique I had never tried before.  And I still plan on using this project to try some new things.  


 I started off with all kinds of big plans...I wanted every week to make a ring using a technique I had never tried before.  And I still plan on using this project to try some new things.  

Another inspiration was to get to know some other jewelry artists.  And I have to say that there is some amazing talent in this group.  Seeing some of the skills that different artists use inspires me to move beyond my own limitations.  To try new techniques and to take chances.  To expand my mind and allow myself to go places I may not have gone before.  

I look forward to seeing what the rest of this project brings for me, and for the other artists that are participating. 

Be sure to check out what inspires other members of this group:


Marcie Abney - labellajoya.blogspot.com
Joanne Harrill - www.jojobell.com
Thomasin Durgin - www.metalriot.blogspot.com
Amy Nicole - www.rubymtnbeads.blogspot.com
Janice - www.doxallodesigns.blogspot.com
Aleksandra Micic - www.micicart.blogspot.com
Lana Chu - www.ginkgoglass.wordpress.com
Evelyn Markasky - www.markasky.blogspot.com
Kerry Alice-Twigs and Heather - www.twigsandheather.blogspot.com
Lorena Angulo- blog.lorenaangulo.com/
Kate Jones-- www.katejonesdesign.blogspot.com
Maria Apostolou- www.createjewelry.gr/blog
Sarah Small - www.bysalla.blogspot.com
Rebecca Bogan - www.Adobesol.com/blog
Elaine Luther - www.CreativeTextureTools.com/news
Rebekah Timlin Meddles - www.lunasadesigns.blogspot.com
Laura M (Zoeowyn)- zoeowyn.blogspot.com/
Kimberly (bahamadawn) - www.bahamadawn.blogspot.com
Erin Austin - www.metalmusing.blogspot.com
Catherine Witherell - www.happydayart.typepad.com
Michele Grady- www.michelegradydesigns.blogspot.com 
Joan Furilla - jfurilla.wordpress.com/ 
Kathryn Cole- www.kathryncolejewelry.blogspot.com 

Handmade Filigree Video


Excuse my french, but this guy is a bad ass.  

Watching him make everything from scratch was amazing.  

It makes me feel like when I say my stuff is hand made that I'm a little bit of a cheat considering most of my materials have already been processed for me.  

Did you see the way he made the paste solder?  And the way he used it to solder all the pieces together? 

Amazing.  

I think I learned a few things....

Friday, February 18, 2011

Weekend Special!!

Free Shipping!!

The listings in my shop have all been changed.

Free shipping to every corner of the world.  Now through Sunday the 20th!

My daughter's latest painting...

I really love this one!

Thursday, February 17, 2011

Valentine Love Necklace


To match the Valentine Love Ring.

Chatoyant Orchid Quartz cut by Terry of LostSierra on Etsy.

Custom order.  

Ring of Fire


Can't remember if I've posted this before a not.  A song that frequently pops into my head....

Wednesday, February 16, 2011

Enameling Basics-Step 6

After sifting the 1st layer on and firing it in the kiln, this is what the pieces look like. The white ones all have a coat of white enamel, and the red ones have a coat of enamel flux on it.

There are several things I want to point out. First, the 2 pieces with the flux on them. Notice that they are red? The flux isn't red. It's clear. The reason the pieces are red is because of the oxidation process in copper. The back is worse looking. Black.

You don't have to completely clean the back before you apply your counter enamel if you don't want to, but you really need to give it a good brushing to get the chunks off.

Counter enameling is very important. And I learned that the hard way. Maybe I'll do a post on what not to do when enameling....;)

Counter enameling simply means applying enamel to the backs of the pieces as well. There is some kind of reaction between the glass and the metal that has something to do with the way pressure is exerted on it or something. Real scientific, I know. All I do know is, that applying enamel to both sides keeps the enamel from coming off. Very important.

Another thing I want to point out is, and it's especially noticeable in the white pieces...see how it's kinda spotty looking? It needs more layers of enamel. This is where the process gets time consuming but also exciting because each sifting gets you closer to the finished project. For example, on the lacy pieces, I enameled about 8 layers before I was happy with the results.

I used the lacy eyelet pieces to make a pair of earrings. From start to finish including all the sawing and refining of the shapes to the enameling and finishing with ear wires, they probably took me about 2 hours to make.

This is where my "how to" will end. As a beginner myself, this is just about all I can tell you. I will tell you one more thing...In between each firing, take a glass sanding block and smooth the surface of the piece. I've noticed that it really helps in the overall smoothness of the final piece.

I have read that enameling takes a minute to learn and a lifetime to master. I learn something new every time I sit down to enamel. I hope you have as much fun as I do enameling!

Conchas-Native Echo


The next in my Concha series, hand stamped copper on sterling silver ear wires. Nearly 2 1/4 inches long they are very lightweight. 

I have named them Native Echo. Did you know that echo was a synonym for imitator? I didn't until today. But I must say that the word echo as it is predominantly defined and its synonym suits my feelings well in creating these earrings.

I feel a strong connection that I can only describe as Native when I hand stamp these conchos. This style is most identified as belonging to the American southwest style of jewelry making. I grew up in Northeast Nevada in a community that had a large Native American community. So for me, when I use the word Native, it encompasses all these things.  Maybe it's just my imagination, but I do hear the native echo when making conchos.  It's a nice place to visit....


P.S. I am fooling around with my blog backgrounds.  I need a face lift, but don't have the time to be fooling around with it.  

Tuesday, February 15, 2011

Trifles


Some are new and some are not.  If a pair of trifles sell and I still have more beads I make more.

It seems that lately the only thing I've managed to get out consistently every week are trifle earrings.

Have I told you when I make these?  

About once a week I make a bunch of head pins and ear wires, and dump them into my bead box.

In the evenings on the weekends we have family time.  Usually this is us watching a movie, or the girls and husband play video games.  Lately it has been us watching DVD's of Little House on the Prairie.  

And I just can't sit there doing nothing.  I enjoy being with my family, and us all talking back and forth about this or that....but my hands want to be busy.

So I make trifle earrings.  I cart my bead boxes,  (Yes, I said boxes...four of them!) my round nose pliers and wire cutters into the living room and make earrings.  

Now that I've gotten started on the reasons I make trifle earrings, I realize that several purposes are met here.

I think I need a list.  ;)

1.  Making trifles keep my hands busy.

2. Mixing of colors doesn't come naturally to me.  I am exploring the mixture of color and shape with each pair of trifles I make.  

3.  I have a bead addiction.

4.  I love having several pairs of everyday earrings to choose from.  I fool myself into thinking I am put together just because I threw on a pretty pair of earrings!  :)

But, back to number 3.  I have a dozen new packs of beads looking at me right now just waiting to be turned into earrings!  Gotta pay for that addiction....

Have a faboo day everyone!


Monday, February 14, 2011

THAW2011-6


Another "better late than never", this time for THAW.  

Enameled earrings.  This shape kept cropping up in my doodles, and I finally decided to make some earrings using it!  

More experiments with layering enamels, and wondering what color I was going to end up with.  This is true grass green.  I've been noticing a lack of green in my shop, so here we go.  Plus, I think I'm anxious for Spring. 

To be listed in my shop soon...

RAW52~6

Just one day late! Better late than never I like to say! Actually, I don't like to say that. I hate being late.

But, I must say that this ring came together quite smoothly. I had all the filigree components made and just sitting around my bench. I decided to use them to frame this beautiful little cab of Queensland Agate from Australia.

She is small, but boy is she a beaut. Red banding in what appears to be a pale purple. Cut here in the US by StonesinMotion on Etsy. The first stone I've set from this seller, and I have to say, she set like a dream!

US size 7 to be listed in my Etsy shop soon!

Enameling basics-Step 5 the first firing

I took this picture when the kiln was cold. The pieces in the photo aren't sifted with enamel. I just wanted you to get an idea of what it looks like going in and out of the kiln.

So. You have sifted on the first coat of enamel. This would be the front of all of your pieces.

Once the kiln has reached melting temp, open the door and gently place the firing trivet in the kiln. You want to do this quickly and as safely as possible. Close the door. It takes a minute or so for the kiln to reheat back up to melting temp.

My kiln has a little window that you can look in. It is cool to watch the powdered enamel change. It goes from the powdered form, to a sort of orange peel look and then finally smooth and glassy.

When it is smooth and glassy, it's time to come out. I know this is vague. With my somewhat limited experience, I don't have the timing down to a precise science.

What I've read, is to check every 60 seconds to see if your enamel has reached the smooth glassy stage.

For me, the glare of the kiln is really hard on my eyes. I only like to look in there if I have my welding glasses on. The bad part about that is that I can't really see the surface of the pieces that well.

So, I watch the temperature on the outside of the kiln. I wait until it has reached close to the max melting point and wait about 30 seconds, and take the pieces out. You can always put them back in and repeat the firing process. It doesn't hurt anything at all.

Really all in all, the firing time is about 3 minutes. It happens quickly enough that you don't really have time to work on anything else, but not so quick that you don't start to think you should really be doing something else while you're waiting. If that makes sense.

I usually try to sift the next layer on other pieces real quick while keeping an eye on the temperature. You can't get distracted and forget or the pieces may over fire and get burnt.

All right. Next step, we'll see what those pieces look like when they come out of the kiln.

Sunday, February 13, 2011

Enameling Basics-Step 4 sifting the enamel

Alright, this is where it starts getting fun.

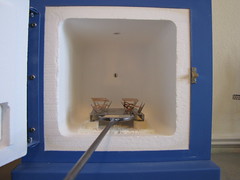
What you don't see in the picture, is that I have set the program on my kiln, and it is starting to heat up to the proper firing temperature. I use medium enamels, so I set it to go no higher than 1410.

While the kiln is heating, I have time to sift the first layer on my pieces.

For me, working with about 6 pieces at a time is perfect. It gives me time to sift layers onto pieces while other pieces are either in the kiln or cooling. Any more pieces than that and I can't get them all completely finished the way I like to once I've started.

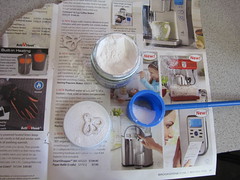
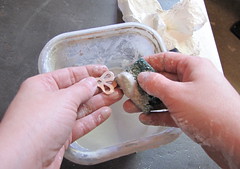
So, this is a picture of how I sift the powdered enamel onto the metal.

I start with a spray of Klyr Fire on the metal. I set it down, and sift a thin even layer onto the metal. (Klyr Fire is a liquid adhesive used in enameling. I got mine from Delphi Glass Supply on line. I've heard that Rio also has it's own name brand of the stuff) (( I use it diluted 50/50 with water))

I then slide it off onto the paper to dry. I use pages from old magazines when sifting. The excess enamel slides right back into the container, and I just throw the page away when I'm finished.

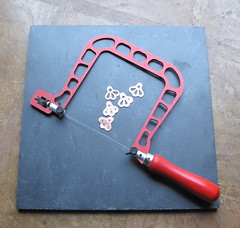
Once I have sifted layers of enamel on all my pieces, I pick them up with tweezers and brush the excess enamel off of the back, and make sure my cut open spaces don't have enamel clinging to them.

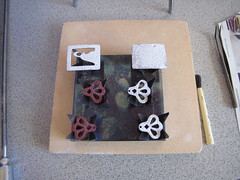
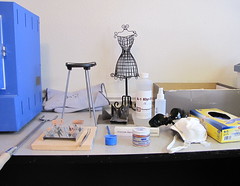
I then set them carefully on the firing trivet. This is where I will continue tomorrow.

***************************************************************************

In other news, I am totally behind on RAW this week. And THAW too. Although at least all I have to do for my THAW is to finish it up and take pics.

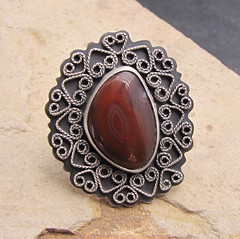
I haven't even started a ring. It seems that I have been off schedule this whole month. Too many bad weather days, and school closures have wreaked havoc on my regular schedule.

I find that I am a person who doesn't function very well outside of routine. Here's to keeping my fingers crossed that I get back on track this week!

Saturday, February 12, 2011

Enameling Basic-Step 3

I normally have my disposable gloves on at this step, but forgot to put them on for the pics.

This step is important because (from what I've read) enamel doesn't like to stick to dirty metal. Even the oils in your hands can prevent the enamel from adhering properly.

The method I use to get the metal as clean as possible is pumice. I buy it in a powdered form from Rio Grande. I throw a handful in a container, add water until I have a nice runny mud.

I like to use scotch bright pads. I just cut them down into little squares.

Give all the pieces a thorough scrubbing on both sides.  Once they are all scrubbed, rinse thoroughly in water.  A way to test your pieces to make sure they are totally clean is to dip them in water. If the water slides right off, they are clean enough. If the water beads up on the piece, you've got more scrubbing to do.

Be careful after they are scrubbed and clean to keep them that way. I never handle them again without my disposable gloves on.

Next step, sifting and getting ready for the first firing!

Friday, February 11, 2011

How to: The basics of enameling Step 2


IMG_8413
Originally uploaded by Amy Nicole Artisan Jewelry
Yesterday I posted a picture of my jeweler's saw, and the copper shapes that I planned on enameling today.

After finishing the sawing, filing and sanding of my pieces, I gathered up my supplies to get started enameling.

This is a picture of table that shows my enameling fork. My trivets and firing stands. You'll also see my welding safety glasses, my particulate respirator, my fire gloves.

A jar of enamel, sifters, my glass sanding block, KlyrFire (used as an adhesive to get the powdered glass to stick) in a spray bottle. A box of disposable gloves.

The shoe box holds all my jars of enamels, and all my supplies when not in use.

Keep in mind, that I am a beginner at enameling. I am completely self taught, so if there is anyone out there reading this that sees any glaring omissions, please let me know!

The second I'm finished getting out my supplies, I put on the particulate respirator. You need to work in a well ventilated area, and always wear a mask! Enameling powder is ground glass. You do not want to be breathing that in! I've read that these glass particles can hang around in the air for up to two hours. Not to mention that many enamels are leaded. (not all)

So, I think that about covers this picture. If you have any questions let me know. Step 3 coming soon!

Thursday, February 10, 2011

The basics of enameling- Step one

Blogging again from Flickr!! (I think I really like this!)

I am getting ready to do another day at the kiln enameling some pieces, and I thought I would document the process in photos.

I think the process is absolutely fascinating. So here we have step one. Saw the shapes out of copper, pierce where the holes go. Saw again.

Fine silver, copper and gold can all be used as the metal base for enameling.

Then comes the refining of the edges by filing and sanding.

I included a pic of my jewelers saw. Which incidentally, I am a little peeved with. After breaking about 6 blades I switched back to my old jewelers saw.

I'm not sure "The Knew Concept" is going to get another chance.....

What little I know about Zentangles...


IMG_8401
Originally uploaded by Amy Nicole Artisan Jewelry
http://www.zentangle.com/index.php I think this is the website of the people who originally started marketing this idea.

On a side note, my daughter had an art teacher whose preferred medium was water color and oil pastels. She almost always filled in her empty spaces in her paintings with small patterns. It really reminded me of this whole Zentangle thing....

http://beezinthebelfry.blogspot.com/ This is the address to the blog of the author of the book I got.

And this is where I first heard about Zentangles.... http://nayswonderland.blogspot.com/2011/02/what-is-zentangle.html
(don't you just love her hat?) :)

My first tangle...


IMG_8398
Originally uploaded by Amy Nicole Artisan Jewelry
I'm having trouble with blogger today. It doesn't want to pull up any of the photos I up loaded today. :( But, I figured out another way to get it handled!

I'm blogging from my flickr account. I think that if you click on the photo it will take you to my photostream. I think. I don't know......but if it does, there are a couple of other Zentangle related pictures.

One is of the cover of the book I got. Which is super cool, but I think may be a little out of my league as a beginner. I'm just going to have to break it down slowly.

The other picture shows the page that I based my first tangle on.

I can see room for improvement, and I need to get the right kind of pen. But I think this is an activity I may enjoy....my hope is to eventually be creating my own patterns. Ones that might even translate well into jewelry!

For now it is just another creative outlet.

Wednesday, February 9, 2011

Zentangles


I've been waiting for my book for a week and it's here! Tonight.....I zentangle!

Love Necklace -Redux


Look familiar? ;)

A couple of weeks ago I was elated to get an Etsy convo asking me to reserve this necklace.  I was so excited I didn't really notice that I wasn't given a time frame on payment.

After about a week without payment, or hearing anything...I contacted the potential customer.  And after a few days of not hearing back I made the decision to remove the reserve.

This is my first experience with something like this, and I guess you can say I learned a lesson.  Not so much about losing the sale, but about losing a potential client because now that person will probably never come back.....

Anyway....This morning we are "snowed in" again.  Schools are closed and right now I am in my studio listening to the bitter winds blowing furiously.  My crazy kids and husband left the house all bundled up to go "play outside", but I won't be surprised to find out that they are in the McDonald's playland sucking down McNuggets while the girls play.  

But I digress...

I decided to re-take the pictures.  I never really was happy with the first set I took.  Coincidentally, the day before I was contacted to reserve it, I had decide that my bezel needed some more finishing.  So I had the bezel looking all smooth and sweet and had planned to take new pics anyway.

So, here I am two weeks later with the new pics.  I'm off to change the pics out in the Etsy listing.  And yes, she is eligible for the 20% sale in my shop with coupon code Love2011.  Today is the last day!!!!

Signing off from abnormally and bitterly cold North East Texas....hoping you all stay warm!